Cricut Setup Explore Air 2: A Complete Tutorial in 4 Steps
Looking for a way to Cricut setup Explore Air 2? You are in the right place. Ever since I bought a Cricut machine, the setup has been a crucial part. I have not only setup Cricut Explore Air 2 but also setup other models such as Cricut Maker, Joy, and Venture. Although every machine setup is the same, you will need to know the proper steps to connect your Cricut to your device.

Without any further ado, let’s delve into
this Cricut Explore Air 2 setup tutorial
and learn things like checking the PC’s requirements, downloading Cricut
Design Space, creating a Cricut account, and finally finishing the setup
process, which includes further sub steps. Remember, the following steps for
Cricut machine setup are only on a Windows computer. Let’s get started now.
Step 1: Check System
Requirements for Your Desktop
In the first step, you must ensure that
the PC you will use is compatible with your Cricut Explore Air 2 machine. This
is a must for the Cricut setup Explore
Air 2 because if your PC doesn’t meet the basic requirements, you won’t be
able to download the Cricut Design Space, which I will discuss in the next
step.
Here, I have mentioned the system
requirements for Windows 10 PC to run the Cricut software:
●
Operating System - Windows 10 or later
(64-bit)
●
CPU - Intel Dual Core or equivalent to AMD
processor
●
A PC/laptop with a USB port or
built-in Bluetooth
●
Display - Minimum 1024px x 768px screen
resolution
●
RAM - Minimum 4 GB
●
Disk - 2 GB free
Step 2: Download Cricut
Design Space
Above, I covered the basic system
requirements to download the Cricut Design Space app on Windows 10. Now, I will
show you how to download the software stepwise. Since the Cricut setup Explore Air 2 is not possible, you have to download
this software on your PC.
Here’s how to download Cricut Design
Space on a Windows PC:
- First of all, you have to navigate to your compatible PC device.
- You will see a small Windows icon on your PC desktop’s screen on a
taskbar. You have to click on it.

- Just start typing Chrome
and hit the Enter key on
your keyboard; it will open your Google
Chrome browser.
- Once you
have opened your browser, you have to go to its search bar.
- After
that, you have to visit design.cricut.com,
paste it into the browser’s search bar, and hit the Enter key.
- Now, you
will move to Cricut’s official website, from where you can download the
Cricut software.
- Here, you will notice a small squared checkbox. Click
on it to check.

- After ticking the checkbox, your Download button will be enabled. Click on it to start
downloading Cricut Design Space.
- Before
downloading, it will open your File Explorer and will confirm where you
want to save this file. By default, it will be saved to your Downloads folder.
- When the download is finished, you have to go to your File Explorer > Downloads folder
or wherever you have saved your downloaded file.

- Double-click on this downloaded file to begin
installation.
- For installation, you can simply follow the
instructions on your screen.

Step 3: Creating a Cricut
Account ID
The second last step is to create a
Cricut account. It is a must; without an account, you won’t be able to do Cricut setup Explore Air 2. In this
method, you will learn to create an account from scratch and then log in to
your Cricut ID. Let’s get started.
- In the beginning, visit
cricut.com/setup.
- After that,
hit the green Get Started button.
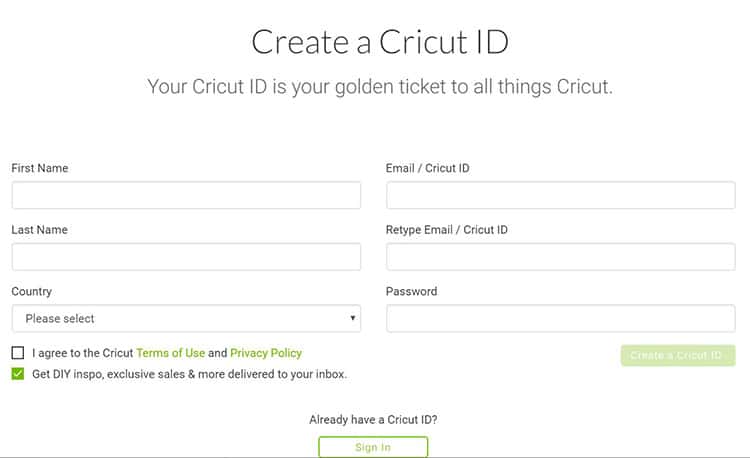
- Enter your
first and last name, including your email address.

- Then, you have to choose your country. (For example,
the United States, Canada, or
the United Kingdom.
- Now, you
will need to read the Cricut terms
of use.
- On the
following screen, tick the checkbox.
- Next,
click on Create User ID.
- You will now receive an Updated Policies pop-up window. To proceed, click the Accept button.
Step 4: Cricut Setup Explore
Air 2 on Your Computer
Once you have created your Cricut ID, you
will move to a Prepare Workspace screen, where Cricut displays it’s on-screen
instructions. You can set up your device by following these instructions. While
displaying on-screen instructions, it will ask you to connect your Cricut to
your PC. To connect, follow the steps below:
Step 1: Connect Your Cricut Machine to Windows
Users can connect to a Cricut cutting
machine using two methods: Bluetooth and a USB cord.
Method 1: Via Bluetooth
- Switch on your Cricut Explore Air 2 cutting machine.
- After that,
position your Cricut machine 10 to 15 feet from your PC.
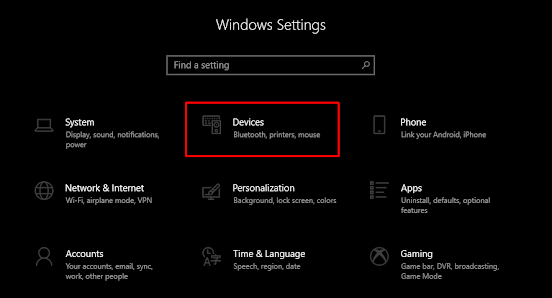
- Then, open Settings on your Windows computer.
- When your Settings window
is open, you have to select the Devices
option.

- Now, confirm whether your Bluetooth is turned on. If not, then you have to turn it on.
- Afterward, you will need to click on Add Bluetooth or other device.

- Next, you will see a pop-up to add a device; select Bluetooth.
- Subsequently, you have to wait for your nearby Cricut
model.

- Once the PC finds your Cricut
machine, select it and finish the pairing.
Method 2: Using a USB Cord
If you do not want to connect your Cricut
wirelessly, you can easily do so with a USB cord. Connecting via a USB cable is
a breeze. Follow the steps to connect with a USB cable:
- Turn on your PC and Cricut Explore Air 2 machine.
- After that,
you will need to take your USB’s one end and connect it to your PC’s USB
port.
- Then, you
have to take the other side of the USB cable and insert it into the
Cricut’s USB port.
- Once done, you’ve successfully connected your Cricut.
Once you have established the connection,
you need to click Continue on your
PC.
Step 2: Cricut Machine Updates
As you click the Continue button, it will start updating your Cricut cutting machine.
Click on the Update button to start
updating your machine. Once the machine has been updated, click next to proceed.
Step 3: Register Your Cricut Model
After updating the machine, the next step
is to register it. To register your Cricut, click the checkbox and then click
the Register button. After
registration, click next.
You will see a screen for the Cricut
Access Trial. If you’ve selected to try out Cricut Access, go ahead and fill
out the required information. Once done, you’ll be prompted to do a test cut.
Move further and follow the on-screen instructions to perform a test cut.
FAQs
Question 1: Are
the setup steps similar for Mac, iOS, and Android?
Answer:
Not really! Overall, the steps will be the same, but
as you delve deeper into the details, they may vary. For example, connecting
Cricut to a PC differs greatly from connecting it to your Mac or any other
mobile device. The same goes for downloading Cricut Design Space.
Question 2: Is a
Cricut account a must for machine setup?
Answer:
Yes, absolutely! Without a Cricut account, you can’t
use your Cricut Design Space and half of the setup uses Cricut software. So, it
is a must to download the Cricut app on your compatible device. Cricut is
compatible with Windows, Mac, Android, and iOS. So, make sure you download this
app before setting up your Cricut.
Question 3: What
is a test cut in Cricut setup?
Answer:
A test cut is generally performed in the last stage of
your Cricut setup. When you have almost completed your machine setup, Cricut
will ask you to perform a test cut. It ensures whether everything has been done
correctly or not. If any problem will be there, it will be detected right away
while performing the test cut.
Visit - Cricut Setup Explore Air 2
Cricut Explore Air 2 Setup Tutorial
Install cricut design space app


Comments
Post a Comment