Cricut Venture Cutting Machine: Setup, and How to Use It!
Whether you're thinking about purchasing a Cricut Venture cutting machine or you already have one, this will be the best guide for every type of crafter. I will be talking about the largest and most powerful machine in Cricut's history. I have been actively using it since Cricut launched in 2023.

Through this guide, you
will learn how to set up and use this Cricut Venture. We'll start with the
unboxing. This is a crafting machine that can cut over 100 materials up to 75
feet at commercial speeds. And it can also cut a single image up to 12 feet. So,
without wasting any time, let's start.
Unboxing the Brand-New
Cricut Venture
To get started with the Cricut Venture machine, you have to
start by unboxing it. Also, check if it contains all the complementary items.
Here is a list of necessary materials and accessories you'll get along with a
brand-new Cricut machine.
● A Welcome Guide
● Cricut Venture
● USB-C cable
● Mat support extension
● 50 plus ready-to-make projects
● black and white removable vinyl
● Roll supports and cleaning tools
● Fine point blade
How to Set Up a Cricut
Venture Cutting Machine?
After unboxing the
machine, you can start setting it up by using appropriate methods. I will show
you step-by-step instructions on how to set up this big machine. Follow each
step carefully to avoid silly mistakes and save time.
Step 1: Install Your Cricut Machine
Before we begin the
technical setup of the Cricut Venture, we need to prepare a proper area to
house the machine. When this happens, place the machine on a no-stick surface
near the power switch. Also, plug your Cricut machine into the power switch and
turn it on.
Step 2: Download and Install Cricut
Design Space
Because the Cricut
Venture is an electronic machine, we have to install the Cricut software.
- First of all, connect your computer to the Internet and visit cricut.com/setup.
- After that, download Design Space by reading and agreeing to Cricut's terms and conditions.
- Furthermore, follow the on-screen prompts and install the
software.
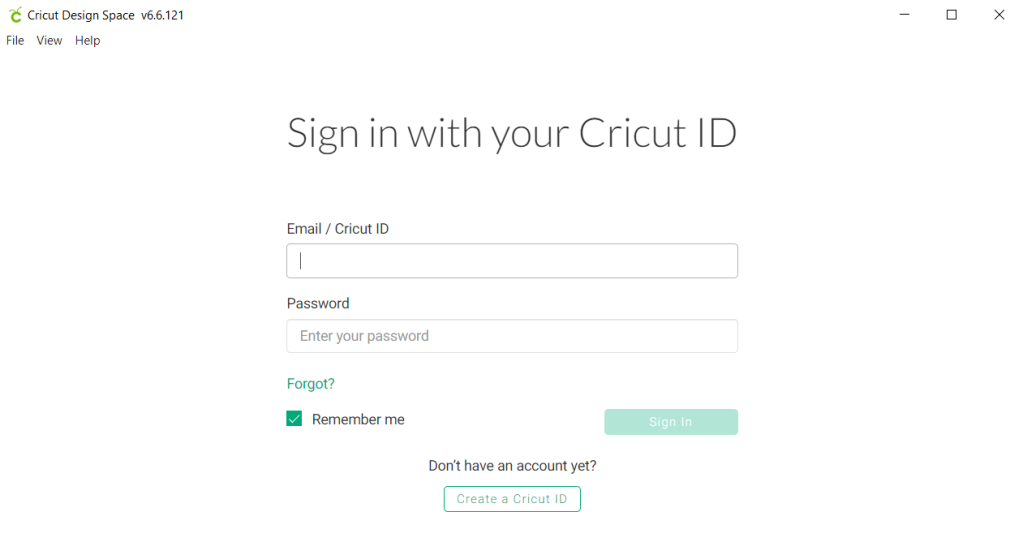
Step 3: Cricut Design Space Login
Once you finish the Cricut Design Space
download and install, log in to that account using the correct credentials.
- This time, start your Cricut app and click "Create Cricut ID." Now, a
page will open in front of you where you have to fill in your full name,
email ID, and country code.

- Then, agree and confirm Cricut's terms and click Create ID.
- Now, wait for a while, and you will get a message.
- Finally, use your Cricut login credentials with Design Space.
Step 4: Add the Cricut Machine to
the Design Space App
In this step, you should add your Cricut Venture cutting machine to the
app. Follow these steps to add your machine to your app:
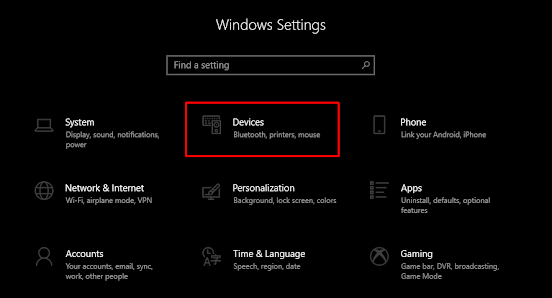
- Turn on Bluetooth on your computer and connect to the Cricut
Venture. If asked for a PIN, mention 0000.
- Now, open the Cricut app, visit the menu, and click on New Machine Setup.

- Here, you will be shown the options for Cricut Heat Press and Cricut cutting machine.
- You have to click on the cutting machine and select Cricut Venture.
Once you complete all these steps, you can go
ahead and start your first cut with the
Cricut Venture machine.
How to Use the Cricut Venture for Your First Cut?
Now, we will create a
vinyl project using the Cricut Venture to show you how to use it. Here are the
essential supplies and tools you will need for your project.
● A Complete Guide
● Cricut Venture itself
● SVG file
● Transfer tape
● Plain t-shirt
● Weeding tool
● Smart iron-on materials
● HTV vinyl
Step 1: Upload SVG File on
the Design Space App
- First, download and unzip an SVG of your vinyl design online.
- Go to your Cricut app, click the Upload button, browse the file, and upload it to the canvas.

- Now, drag and resize the design according to the size of your
surface.
- Finally, click on the Make
It option to go to the next page.
Step 2: Choose the Base
Material
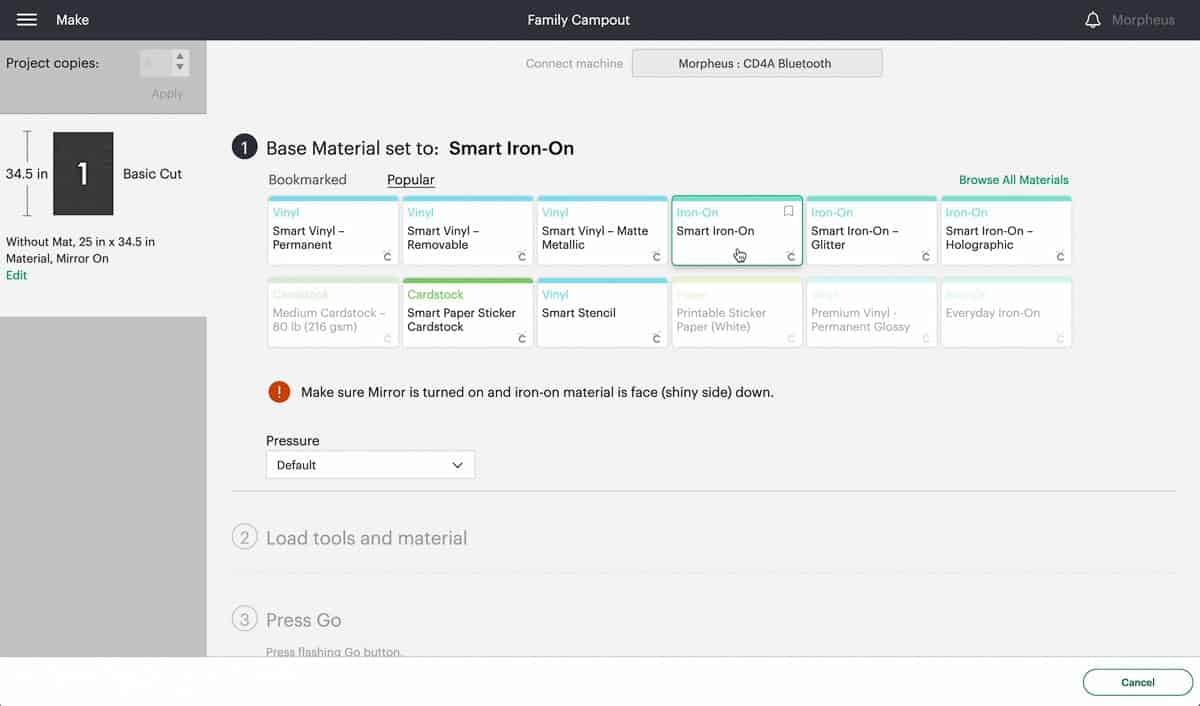
- Now, you will move to a new page; here, you will be asked how you
will load your material and what will be its width. I have selected
without mat and width 25 in for this project.

- Also, remember to turn off the Mirror option and click on the Continue button.
- Then, we'll be on the "Browse
All Content" page, selecting Smart
Iron-On and leaving the pressure Default.
Next, move to the Cricut Venture.

Step 3: Prepare Your Cricut
Venture Cutting Machine
Venture and Cricut are
different from machines; we have to prepare them before using them.
- First, lift the lever on the left side of the
machine. Since we are using 25-inch vinyl, move the arm end of the
machine.
- Afterward, lift the material guides on the left and
right, and kindly close the center.
- Now, with the shiny side down, push the bundle of
smart vinyl into the back of the machine.
- Finally, push down the lever and lock the arm.

Step 4: Start the Cutting
Process
- Now, we are completely ready to cut iron. On the front of the
Cricut Venture, you will find three buttons: Load, Start, and Pause.
- When the Load button
begins to blink, press it so that the machine can measure the material's
size.
- Once the machine has completed the measurement, the Start button will start blinking.
Press that button, and the Venture will think for a moment and then start
cutting.
- Once the cutting is done, take off the blade and cut the used
vinyl.
- Vinyl is sticky on the back, and that is why use the weeding tool
and weed out the unwanted parts.
Step 5: Press Your Design with
the Cricut Heat Machine
To put the design on my
shirt, I am going to use the Auto press; you can also use your heat press. For
this, use the Cricut Heat Guide to prepare your shirt, place the design in the
center, and apply heat.

Final Words
We have covered
everything about the Cricut Venture
cutting machine briefly. It is a smart machine that can cut material at a
high speed of 25 inches per second. To use this machine, we need to set it up
by setting up the Design Space, which is explained in detail in the guide
above. Also included a detailed project instruction from design to cut and
more.
Source URL: - Cricut Venture cutting machine
Visit - Cricut.com/setup


Comments
Post a Comment